Double Irish Chain
OR, What I learned from my summer quilting project.
A couple years ago now I think I made this Double Irish Chain.
I so love little tiny squares & and I love making the blocks. This one was going to be for summer picnics in the backyard with my daughter. ha. ha. ha.
I just finished quilting this yesterday, Sunday. By the time the binding was on I very nearly never wanted to see this quilt again. You know how that is right? Of course my daughter moved away from home this year but for me this was a personal promise that I would finish what I started!
(no fair asking about the floating 9patch I did at the same time)
(or the Chinese Bento Box/Sashiko quilt I'm currently working on as well)
(or well... I know you know how this goes)
But here's what I learned.
I was originally going to add hand made bias tape (in the yellow fabric) in the form of a repeating Celtic knot that I love on all those pink center areas. I was then going to echo quilt those knots & do some fun quilting on the actual chain part of the design.
You know, doing Celtic knots is very much a process. Creating the bias tape out of the excess material (of which there was none) then adding the self adhesion strips to it then deciding if I wanted to machine stitch it all down or hand applique...
I just lost all heart to do this after so long that I told myself I was only using that as an excuse not to finish it. So I told myself in the mirror that I would finish this and since it was just for me anyway I could do whatever I wanted! (I was feeling rather bullied by the whole quilt itself by then & once the real hot-flashes of menopause kicked in I grew rather surly right back) *Que maniacal laughter*


Some in process shots.

 I decided to make it a sampler of machine quilting. I would try out different motifs I'd never used and practice them. Doing so in the big pink areas. Course I didn't really plan that out very well as it's so bloody busy the thread wasn't going to be very visible from the front. But I outsmarted myself when I used white for the backing. I could then flip the quilt over when I got tired of all the color & just have a lovely white quilt on my bed. I decided to use the green isacord thread for the bobbin and top stiching for those areas.
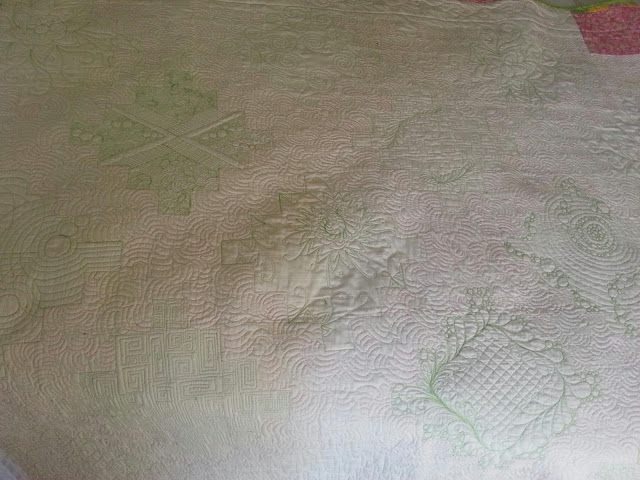

Some shots of the back with the different motifs. I learned a lot about feathers,
mainly I tried using different methods of free motining them on my domestic machine. It's not easy but it is do-able. I can tell I need lots more practice on those and while I admire the giant quilts at festival with all those glorious feathers around the borders & filling every available inch of space I won't be trying those anytime soon without a longarm.
This motif was rather badly handled by me as I changed my mind halfway into it but I still love the look of the thing and in future will use templates to give me the perfect 'rings' I was attempting here. What I love is the mix of the wave pattern and the rings.

I learned to use all available scraps for making the binding. I had some leftover piece strips and they give a charming detail to the edge treatment I think.

See that border pattern ^^^
Well let me tell you what I learned about myself, my machine & using a paper sticky pattern to quilt over.
Well the very first thing I learrned about paper patterns (the kind that have sticky on the back that you lay over the material then stitch down following the dotted lines) is that they were created by soul sucking, red eyed monsters from the planet Zargon who are in leagues with the Quilt Police and who's sole purpose in life is to create perfect lines that lesser humans (esp. ones with a tad of OCD) will spend hours cryin gover, seam ripping, retistching (only to go one more inch & re-rip out) and finally in disgust: simply walking away from their machines trying to resist the urge to throw machine & quilt out the nearest window.
Or, maybe that's just me. *sigh*
1. Myself, I'm apparently not a very patient person. I love to free motion quilt and I find that the faster I go the better. It helps keep my 'flow' working and the lines remain smooth. It never fails that when I slow down my lines can get all jerky looking and I start getting all nervous. I loved creating these feathers but stitching those damnable dotted lines gave me such stress! Never again!
It was like being back in home economics making that first wrap around skirt when I stiched all the wrong sides to each other and then when I said I kind of liked that one of the panels was backwards I incurred the wrath of my teacher telling me I was just being lazy & didn't want to rip out the seam. (it was only later that mulit colored denim became popular so I stand by my feeling I should have left one panel reversed)
What does it say for me doing this kind of quilting was so much easier than following lines?
2. My Machine didn't really like it either and I think going thru that paper really can dull your needles faster than spit!
Plus then you have to rip all that paper off which is time consuming.
After I took off the paper I realized what a crappy job I did stitching. Since this quilt is just a practice piece I gave myself permission to be okay with that and move on.
 Some feathery stitching. Soooo time consuming and easy to get lost, thank heavens I was only doing a 1ft. square area at a time. Even so it was infinitely more fun that 'following the dotted line'.
Here it is all done.

I hadn't pressed them all out yet as it was going straight into the washer after this photo was taken so you can see the tension in the corners.

And once it was out of the dryer me & Ollie had a fun time takin a nap under it.
Even with all the imperfections, it was Puurrrrrfect for snoozin.


Comments
Post a Comment