Weekend Calligraphy Work
Needed to get some 'Thank You' card material ready! El and I had fun working on this project together since she needed some 'TY' notes all ready for graduation gifts, etc. and I need to send a couple out myself.
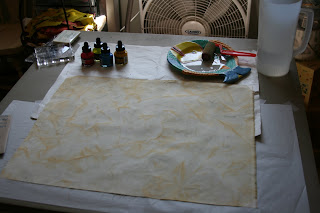
I pre-painted this fabric the night before. It is unbleached muslin that I simply dunk-bathed in some FW acrylic wash. (this was basically putting a couple drops of the ink into water and a tub and dunking the fabric in it quickly all wrinkled up then placed on a rack in my dryer)
After it dried I ironed it to return the natural hand of the fabric. It then looked like this:
Next we had purchased some inexpensive stencils with large 6" letters.
I wanted to play with using large letters on the initial background in pale grey.
You can see how watery we made this to start.
sorry; the camera lenz went a bit fuzzy here.
We learned that even with the Jacquard 'No Flow' (that was not rinsed out) on the material along with all the pre-paint we did that was heat set, if your acrylic ink is watered down into a wash it will bleed out regardless :( I'm really glad I learned this issue as I was going to try this technique on a much larger quilt I'm making for a show and this bleed would have been a disaster! You can see the letter 'T'.
so we changed tack & used the ink full strength with a dry brush instead. Much better but it doesn't solve my problem that I worked out and will address in the next post.
Here's our background lettering finished:
After each step we heat set the ink by flipping the material over and ironing it on the high setting with no steam.
Next we went onto adding colors and shapes! FUN!
the best part of this is if you make a boo-boo, you can just add more paint or shape & cover it right up!
Then onto the hand calligraphy. We each made it a point to try a new 'font' style and we used the Parallel Pens by Pilot. They worked well on this type of material.
All Done!
Next I cut it up randomly to make 4" x 6" sizes which we then stitched onto a plain card-stock.
It took around 6 hours from start to finish and I think it was worth it. We had fun, learned something and I now have much of this left over and that will make nice additions to other projects or more cards. Tomorrow will be a post on more calligraphy for my 1ft square donation to SAQA. (which is all ready larger than 1ft square and now I don't want to cut it up) LOL
Thanks for reading!


It looks like you and El had a lot of fun doing this project. I'm curious how it looks cut up - great, I'll bet!
ReplyDeleteI love getting the Thank You card from you! It's even better to see the process of how you made it! You and El are two wonderfully awesome women!
ReplyDeleteWow this is so beautiful! Nice to meet another Stacy and Ellie, lol! Great names! :)
ReplyDelete