How do you sort?
Recently I have begun to reorganize my sewing room. I find that as my style of art quilting changes so my work area needs change also.
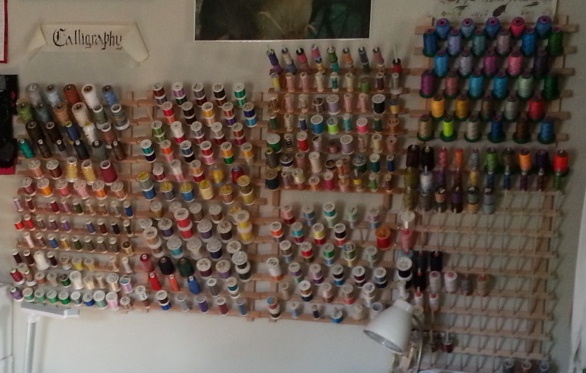
The last thing to do was tackle the thread wall. Here is the before photo:
The reason this was difficult for me is two-fold:
1. I chose the thread I will use by the project I'm working on. Bed quilts, lap, baby quilts all get Aurifil; Art quilts can get anything from *this all I have in this color* to *ooooohhhh, shiny!*
2. I hate resorting anything.
So my dilemma; I instantly chose to procrastinate by going online pose the question on Facebook! "How do other quilters sort their thread?" I pondered. Not long before I had an answer...
COLOR was the resounding method of choice. I was very happy also to see the number of quilters who also use the method of thread type and for reasons similar to my own.
Lately I've been finishing some bed quilts warming up my machine quilting muscles for a baby quilt due at the end of July. I use the Aurifil for those types of quilts and that thread I like to keep separate so that I know what colors I have what colors I might need (which is nearly all of them right now but that's another goal). My machine loves this thread & I get the minimum amount of frustration in using it. I am keeping those separate for the time being. (like little orange nuggets of gold)
When I do more art quilts I will go into the metallics, monofilaments and holographic threads and those I liked to keep in a separate area for ease of handling as they don't store all that well. (tails and dangly bits tend to bug me a lot, plus when the kitty krew is in helping those are dangerous.
Now that I've turned over all these new 'let's get organized' leaves I've decided rather than searching in five places for a specific color when I'm ready to quilt something that may or may not require a specialized thread it might be easier to follow suit with many of my fellow quilters and sort by color.
One last project that my daughter and I did this weekend before she left to go back to school out of state was to take all the thread down and reorganize it by color. As I mentioned earlier, this is not something I like doing so it was helpful that while I gave her tea and icepacks for her recent wisdom teeth removal that she could put her OCD skillz at my disposal. Even if she wasn't camera ready...
One last project that my daughter and I did this weekend before she left to go back to school out of state was to take all the thread down and reorganize it by color. As I mentioned earlier, this is not something I like doing so it was helpful that while I gave her tea and icepacks for her recent wisdom teeth removal that she could put her OCD skillz at my disposal. Even if she wasn't camera ready...

My job was to make sure the thread spools were wound, tails tucked and that they were all laying sideways so that she could then come in and sort them all quickly by color/hue. The she could start putting them back up on the wall in an order that she chose.
When you stand and look at my thread wall what you mostly see is white spool tops.
(by the way; this is the after photo)
(by the way; this is the after photo)

but I designed the thread wall to be viewed while I was sitting at the machine ready to quilt or stitch so this is the view while seated at my machine: yummo!


I still keep the utility colors all together: piecing grey; black & whites. I left lots of space for this years trip to Long Beach Festival where the first place I'm going is the Aurifil booth! Sometimes you can pick up a show special or something where the cost is a little expensive than full retail at the quilt store.
All the thread holders were purchased at Joann's and always half price! Only thing was that some spindles were very short and the thread spools now are taller. I found the workaround to purchasing all new racks by simply buying a bag of straws. The straws are just large enough to cover the existing spindle and still give you support for the longer spools so they don't flop forward. (ok, that would be my ocd thing) All standing at the same angle.
All the thread holders were purchased at Joann's and always half price! Only thing was that some spindles were very short and the thread spools now are taller. I found the workaround to purchasing all new racks by simply buying a bag of straws. The straws are just large enough to cover the existing spindle and still give you support for the longer spools so they don't flop forward. (ok, that would be my ocd thing) All standing at the same angle.
El sorts the Isacord. This grouping was gifted by a friend who was moving them on. I nearly wept with gratitude! In point of fact; all the shorter Madera rayon spools were gifted to me as well a couple years ago. There were over 30 spools; it was such an amazing gift.
Many quilters out there know full well that this craft is not inexpensive; for many of us on limited (or no) disposable income to receive such extravagant gifts like these thread collections can be such an overwhelming blessing!
I would like to take this opportunity to thank those women again; Jamie Fingal; Cathy Norton & Joanell Connolly. We truly do stand on each others shoulders.
close up of the straw extentions
Thanks for stoppin by!
I have a couple finished quilts to post this week so stay tuned!


Hello, trying to figure out a good way to hang the thread rack on the wall. Looking around on the internet for the best way. Do you have any suggestions? Thanks!
ReplyDeleteHi Sharon. I put the rack where I want it and lightly draw a line under the top tier (using the wood tier as a guide) I then tae out my level and make sure the line is level. I hammer a couple long nails in (making sure they will be long enough to catch the top tier). Put your rack up on them and see if it suits you. When doing multiples as I have you reallu only need to level the first two on the left. The rest you can butt right up against them.
DeleteThanks! I will give it a try. :)
Delete