Long Beach Quilt Festival 2013 Part 3
Ok so I went only looking at the vendors for a mechanical chalk pen that I had heard about on YouTube by a fellow machine quilter who swears by them.
Sadly, there were none at Festival but in speaking to Cynthia Caitlyn she mentioned she used this pen for her marking needs. She really liked them and (ironically) you don't have to buy them at festival, they have them at Staples... I didn't know or I would have waited. Anyhow!
When free motion quilting many times it is necessary to actually mark your design lines first before rippin off a bobbin & firing up your machine.
(I've learned this is the 'patience' part that is important to acquire-and I seem to need to re-learn it on every project)
So I purchased the lightest color they had (as they didn't have white) because most of my quilts tend to run in the dark tones. I couldn't wait to get home and try this out. Here's what I have discovered.
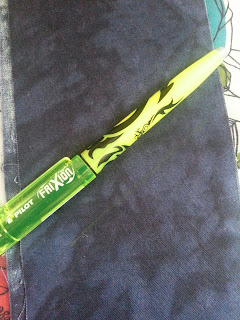
The pen is called Frixion. See this little nubbie thing on the end? That's the eraser. If you use this on paper you can erase your lines with it. The name of the pen means, friction needed to erase.
I took a piece of fabric I intend to be using.
And THIS IS VERY IMPORTANT... VERY, VERY IMPORTANT!!!
TEST IT ON THE FABRIC YOU INTEND TO USE FIRST!
Unlike my normal 'charge in' mode I decided to read all the reviews first and they all said the same thing so I figured it was prudent advice. (Look Ma! I'm growing up!)
When you first mark, the line it's yellow. Very nice, it doesn't disappear into the dark Indigo nor does it simply 'melt' in the fabric. Step 1, Good!
Step Two; touch with Iron to make line go away (per instructions, the yellow line should now be gone)
Oops. Nope. It simply turned white.
If you are working on light material this may not be all that bad but I'm just OCD enough to ask, 'Well what if it's on light pink or something? Then white would still show up?' Answer: "Yes"
So the bottom line is that like any other invisible marker test it first, it may not suit all your needs but may surprise you
.
I did use it to trace some 'seeds' that I cut & then will machine applique. See here:
This is the project: (free tutorial if you're into instructions...) :)
While at festival I found this pack.
It was a lot easier to fussy cut the red & tourquoise seeds once I had traced them right onto the fabric which had already been misty fused.
Pattern maker suggested tracing each one on wonder under then cutting the paper part out then putting it on the fabric, then cutting the whole thing out again. Not my idea of expedience. I misty fused the entire fat quarters, cut out in cardstock the seed then simply laid it out on the fabric where I wanted & traced. Then only had to cut once & got more mileage out of the material.
Other purchases:
Fun Sashiko thread & needles for my Bento Box. I'm going to embroider two large koi (36") going up either side of it.
Some fun finds from Sew Party booth.


Yikes, thanks for the Frixion warning! I haven't tried mine yet. I love your project with the new pack of fabric.
ReplyDelete